Patina Practice
I have an idea for a shoulder piece in a Post Apoc game I attend called Dystopia Rising (Northern California). Most of what I see though is rusted metal/steel and I decided that as we have a slight nautical theme to our game, it would be nice to make it out of brass and try to age that with patina. And instead of dropping the $15+ shipping on 8 ounces (and I really only need one) a professional aging chemical, I would follow my own advice and go to YouTube and see what videos there were of it and experiment with the different techniques. Here are my results. If my explanations are too much, just scroll to the pics and I’ll have the simple what I used in the descriptions
First I used both copper and brass in my experiments. Brass’ composition includes copper and that’s what oxidizes to give that characteristic patina called verdigris so I was expecting similar but more subdued reactions with the brass. Most people use a a setup where you sand or use 90+% alcohol to clean the metal, ‘paint’ onto the metal a coating of vinegar, sprinkle salt on it and then place it in a sealed container with ammonia – making sure the metal and the ammonia do not touch. Then wait anywhere from 2-24 hours depending upon the detail you want.
So here was my base setup – in a very miniature version:
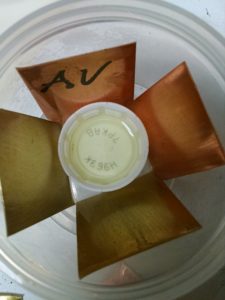
I should note that I used a lemon scented bargain ammonia and apple cider vinegar. Would there be different results? Don’t know but worth more experimentation later on. Oh, and just for clarification sake, the vinegar coatings are put in wet.
Each piece I used a green scrubby to remove whatever finish/scratch it up a bit on one side of the test piece (26 gauge in both cases) and the lettering is on an unaltered side used for marking the pieces (AV=Ammonia Vinegar). I sealed it and walked away for 18 hours. These are the results

As you can see, the non treated had almost no effect save at the very bottom where it was in contact with the container’s bottom. Not sure for the reason of this. A quick Google search states that in high humidity areas, ammonia vapors can condense and become heavier than air so maybe with the addition of the vinegar it settled and corroded it more? There was a YouTube video where someone put in a large, dry copper piece above ammonia for 24 hours and it came out basically black. So I don’t know what that was about but this was my result after 18 hours. And the back sides looked like this
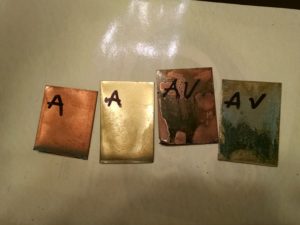
It would seem that the vinegar ran a lot more on these pieces but still an interesting pattern and color came out. I assume longer exposure will deepen the effects.
Second Test
I wanted to try a couple of tricks that were shown in other videos. I did the most often suggested method of vinegar with sprinkled salt on the surface. I also tried just spritzing a piece of brass with water that came out with a very black look to it with the water spots remaining more brass. And there’s a texturing technique using wood shavings (such as for small rodent bedding) that are dampened/soaked with ammonia and the vinegar covered pieces are given a quick shake in the bag to cover them with the shavings. I did not have such stuff on hand and was too lazy/cheap to go out and buy them so I used some hay I had left over from my rabbit and cut it up into smaller pieces. So here’s my setup for the second test
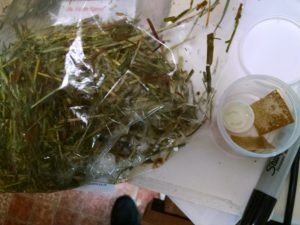
I wasn’t really pleased with the results after 18 hours. There was no result on the spritzed piece and the salted pieces weren’t as vibrant as the videos showed so I did some quick changes.
I pulled all the pieces out and poured a thin layer of ammonia into the container’s bottom. I then submerged the spritzed piece into it just to see what would happen. I then had a container that fit within the main container so I put the salted pieces into that, put the container on top of the brass under the ammonia then, remembering a blacksmithing friend wanted to try something tomorrow, put a piece of 20 gauge brass across the top of the inner container that I coated with vinegar. Sealed it all back up for 6 hours and this was the result
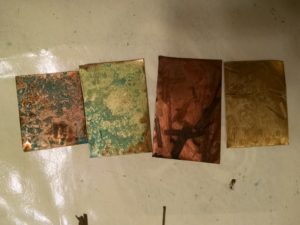
There wasn’t a lot of difference in the change of color over those six hours for the salted pieces and the submerged piece didn’t change at all. How could it if it needs to oxidize – duh. And I think my salt pieces didn’t have the same vibrance as the other pieces as I just used regular table salt. I think that the larger the grain, the more color you get. My belief (unresearched) is that the salt helps to ‘pool’ the vapors while leaving the piece exposed for oxidation.
The pattern of the hay was intriguing though and I figure that using other medium to hold the ammonia in place might be interesting. I saw someone use a piece of paper towel and the dappling effect the texture had on it was intriguing. The piece I laid over the top however…
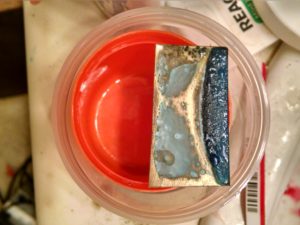
So I imagine/hypothesize that with the positioning, the concentration of the vapors coming up over the lip of the inner cup caused the much deeper reactions to the metal. The piece was set back a bit further with the other pieces helping to support it so that the edges of the very dark blue on the metal corresponded with the edge of the cup. Just that when I opened the container, the piece fell into the cup so I couldn’t get it back in place.
The fact that there was zero reaction underneath it also might tell me why there wasn’t any major change to the other pieces over those six hours as the ammonia vapors probably didn’t head down too far into the cup (could be wrong of course). This will be something interesting to try out – different platform shapes at different heights from the ammonia.
I am continuing one last experiment. I wanted to see if I could layer the vinegar back onto the first ammonia and vinegar piece (and IMO, the best results I got). But what do you think happens when you put a mild acidic compound that people use for cleaning onto tarnished metal?
Yup.
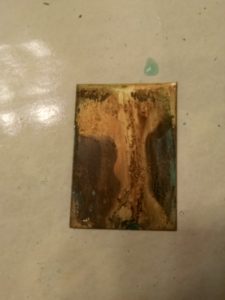
I put it back into the ammonia chamber for another overnight bath but I believe that there wont’ be a pronounced change. I’ll come back here and post the photo of it but I really got the answer to which type of process I want to go with.
As a final wrapup – this was fun to see what happened playing around and experimenting. It is something I suggest everyone does with their processes. Try different techniques, scour YouTube and as always, do it safely. No one mentioned what of reaction/gas is produced in this process. However, having a rather quirky chemistry teacher in High School, he had a mantra he used to chant. “An acid plus a base equals a salt and a water”. Still though, I wore gloves and a high quality filtration mask as well as safety glasses just in case.
In addition – when I say in this article that something could be looked into more or further experimentation could be interesting – I’m not saying I’m going to do it. I’ve already done my experimentation to find the result I need. But feel free to take what I gleaned from this process and move forward yourself.
Oh, and one last note. All of these patinas will rub off somewhat easily (ever have a green finger from a copper or brass ring?). So using a couple coats of a clear sealer when all is dry is highly recommended. One individual used a wood polishing wax on his darkened piece of copper that not only helped to seal it but gave it a nice, buffed glow to it – like a well worn handle.
Have fun and always be creative.
Addendum:
I thought I’d check in on the pieces after the 30 minutes it took me to write this piece. Here are the results.
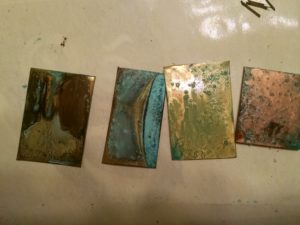
Left to right is the piece I repainted with vinegar and had removed most of the patina. It looks like the original patina is working as a block to the new stuff but will need more than half an hour to find that out. The 20 gauge piece that sat on top of the inner cup now dried and I LOVE that color. The two right pieces were the ones with salt I sprinkled on them. But this time, instead of dusting them like I would french fries, I lightly pinched only a few grains onto the surface after the initial vinegar coating.
So once again, I should learn not to rush things. I have a feeling that if I had let the salted ones thoroughly dry (the salt was still a bit ‘wet’ when I brushed it off) it would have been better. The salted ones and the rebrushed piece are back into the ammonia chamber. The ‘inner cup’ piece my blacksmith friend will be seeing if he can ‘hammer’ the pantina into the brass permanently. Apparently there’s a technique to do this with rusted metal where pounding the rust into the metal actually creates a rust resistant surface and a very interestingly ‘reddish’ armor after it’s been polished. Who knew?